I made a NES emulator in Rust using generators
Emulators are cool! They help preserve games, improve games, and help make games more accessible. On top of that, making an emulator is a cathartic and satisfying technical challenge!
So, I took this challenge myself and came out the other end with a pretty limited NES emulator, which I call Lochnes. It’s not very good at actually emulating most games, but I’m pretty happy with the guts of the thing and I learned a lot a long the way. I figured it might be worthwhile to share my approach, which might help or inspire others on their own emulation venture!
But before we get to that, let’s talk some emulator theory…
The heart of an emulator
The idea of simulating a whole computer sounds pretty scary! But, it’s really not that bad when we try to visualize what our emulator actually needs to do:
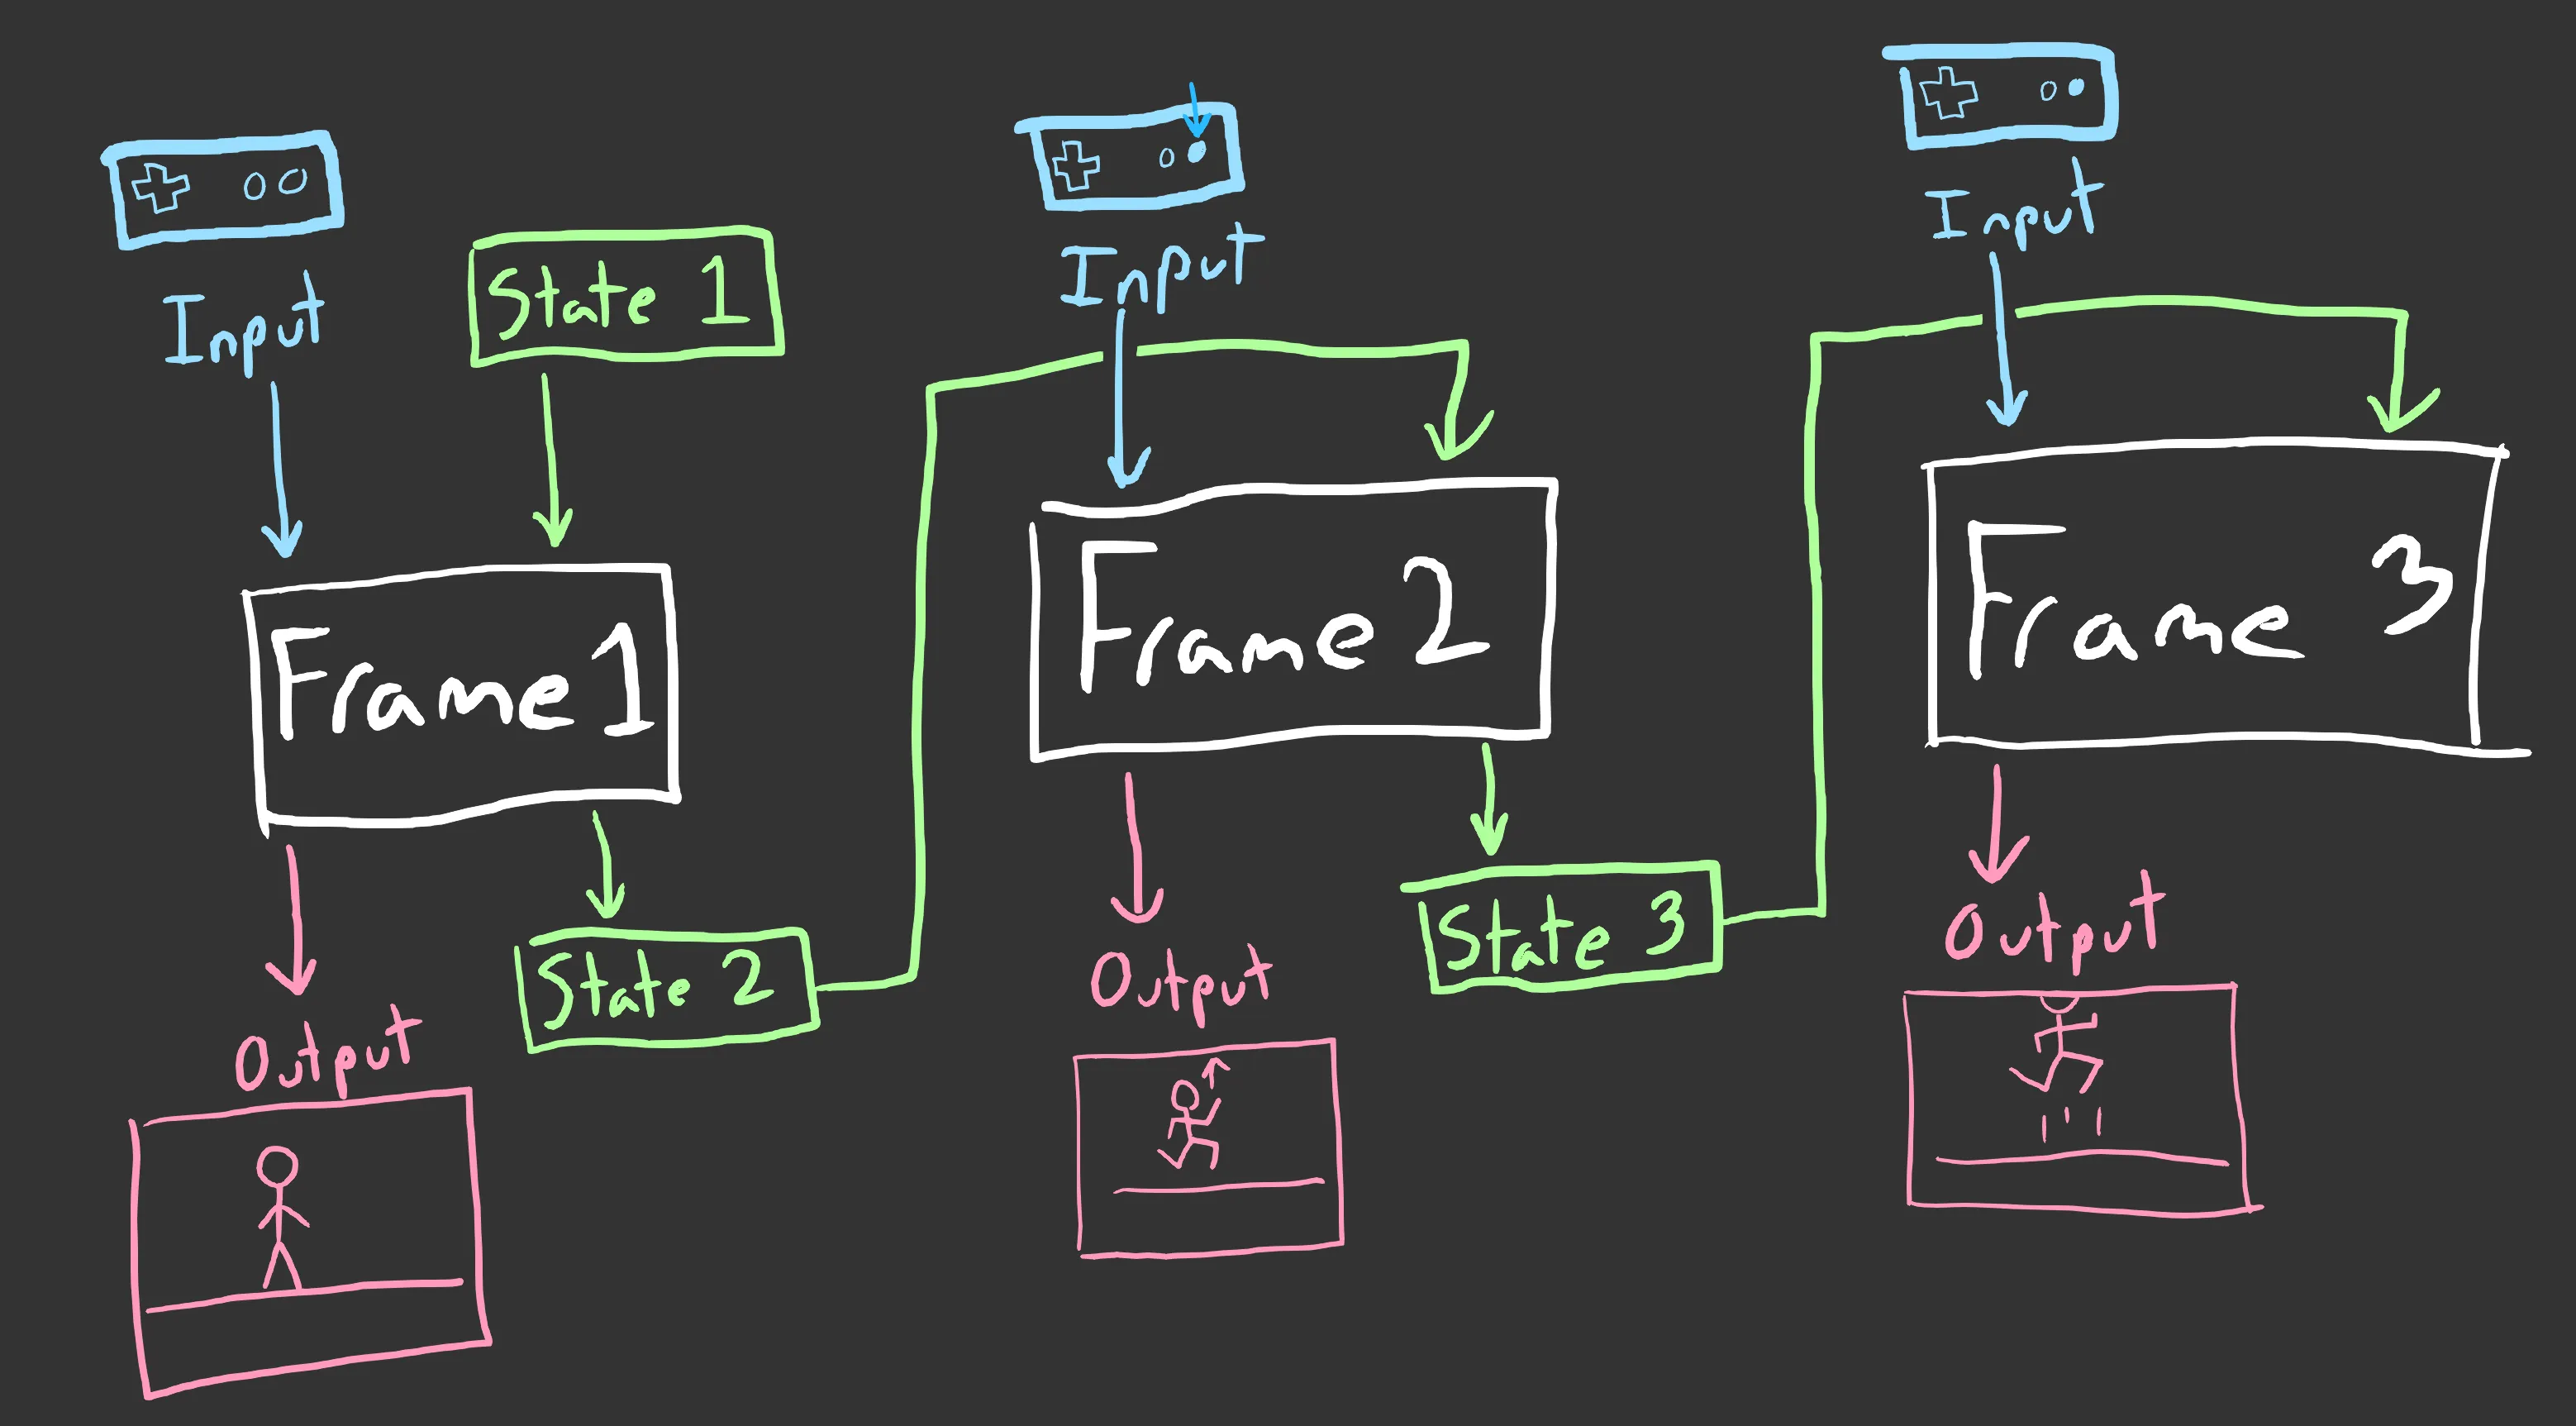
So basically, for each frame that we run, we take the current state and the player’s current input, we do some work, then we output some video/audio and produce the new state for the next frame. The “state” we care about includes everything in the NES, which includes the registers for the CPU, PPU, and APU; the NES’s built-in RAM; and any ROM/RAM included in the game cartridge (yes, cartridges can include RAM!)
What’s in a frame?
Unfortunately, the diagram I gave above is a bit of a simplification for our purposes. Specifically, we need to do some work each frame that deals with the CPU, PPU, and APU state. Each one is a separate component that does a specific job:
- CPU: Hopefully you’re familiar with the concept of a CPU! In the NES, it’s a derivative of the MOS 6502 (the Apple II, Atari 2600, Commodore 64, and others all used 6502-like CPUs as well). This is the only directly-programmable thing in the NES— to use the other components, you would go through the CPU first (hence “central” processing unit).
- PPU: The Picture Processing Unit, does the pixels and such. It outputs at a resolution of 256×240 pixels, uses 8×8 pixel tiles, and supports like 55 different colors. Annoyingly, it outputs colors directly as NTSC signals rather than using some sort of RGB-to-NTSC conversion, meaning there is no “definitive” color mapping from NES color codes to RGB colors (this is why the game will often have different colors in different emulators).
- APU: The Audio Processing Unit, does some basic bleeps and bloops. It also does some frame timing stuff I think? But I don’t know much about it beyond that because I haven’t implemented it in my emulator yet! Basically you don’t need to implement it for (some? many? most?) games if you just care about drawing to the screen. Fun fact: the Japanese Famicom gave games some control over how the APU produced sound, which is why the Japanese releases for games like Castlevania III sound better. Supposedly the American NES still has the hardware for this, but the connection isn’t wired up to the cartridge slot.
Well, that’s all well and good, but all three of these components run at different speeds! They all share the same master clock, but each component’s clock divides the master clock by some amount. Or, as another diagram:
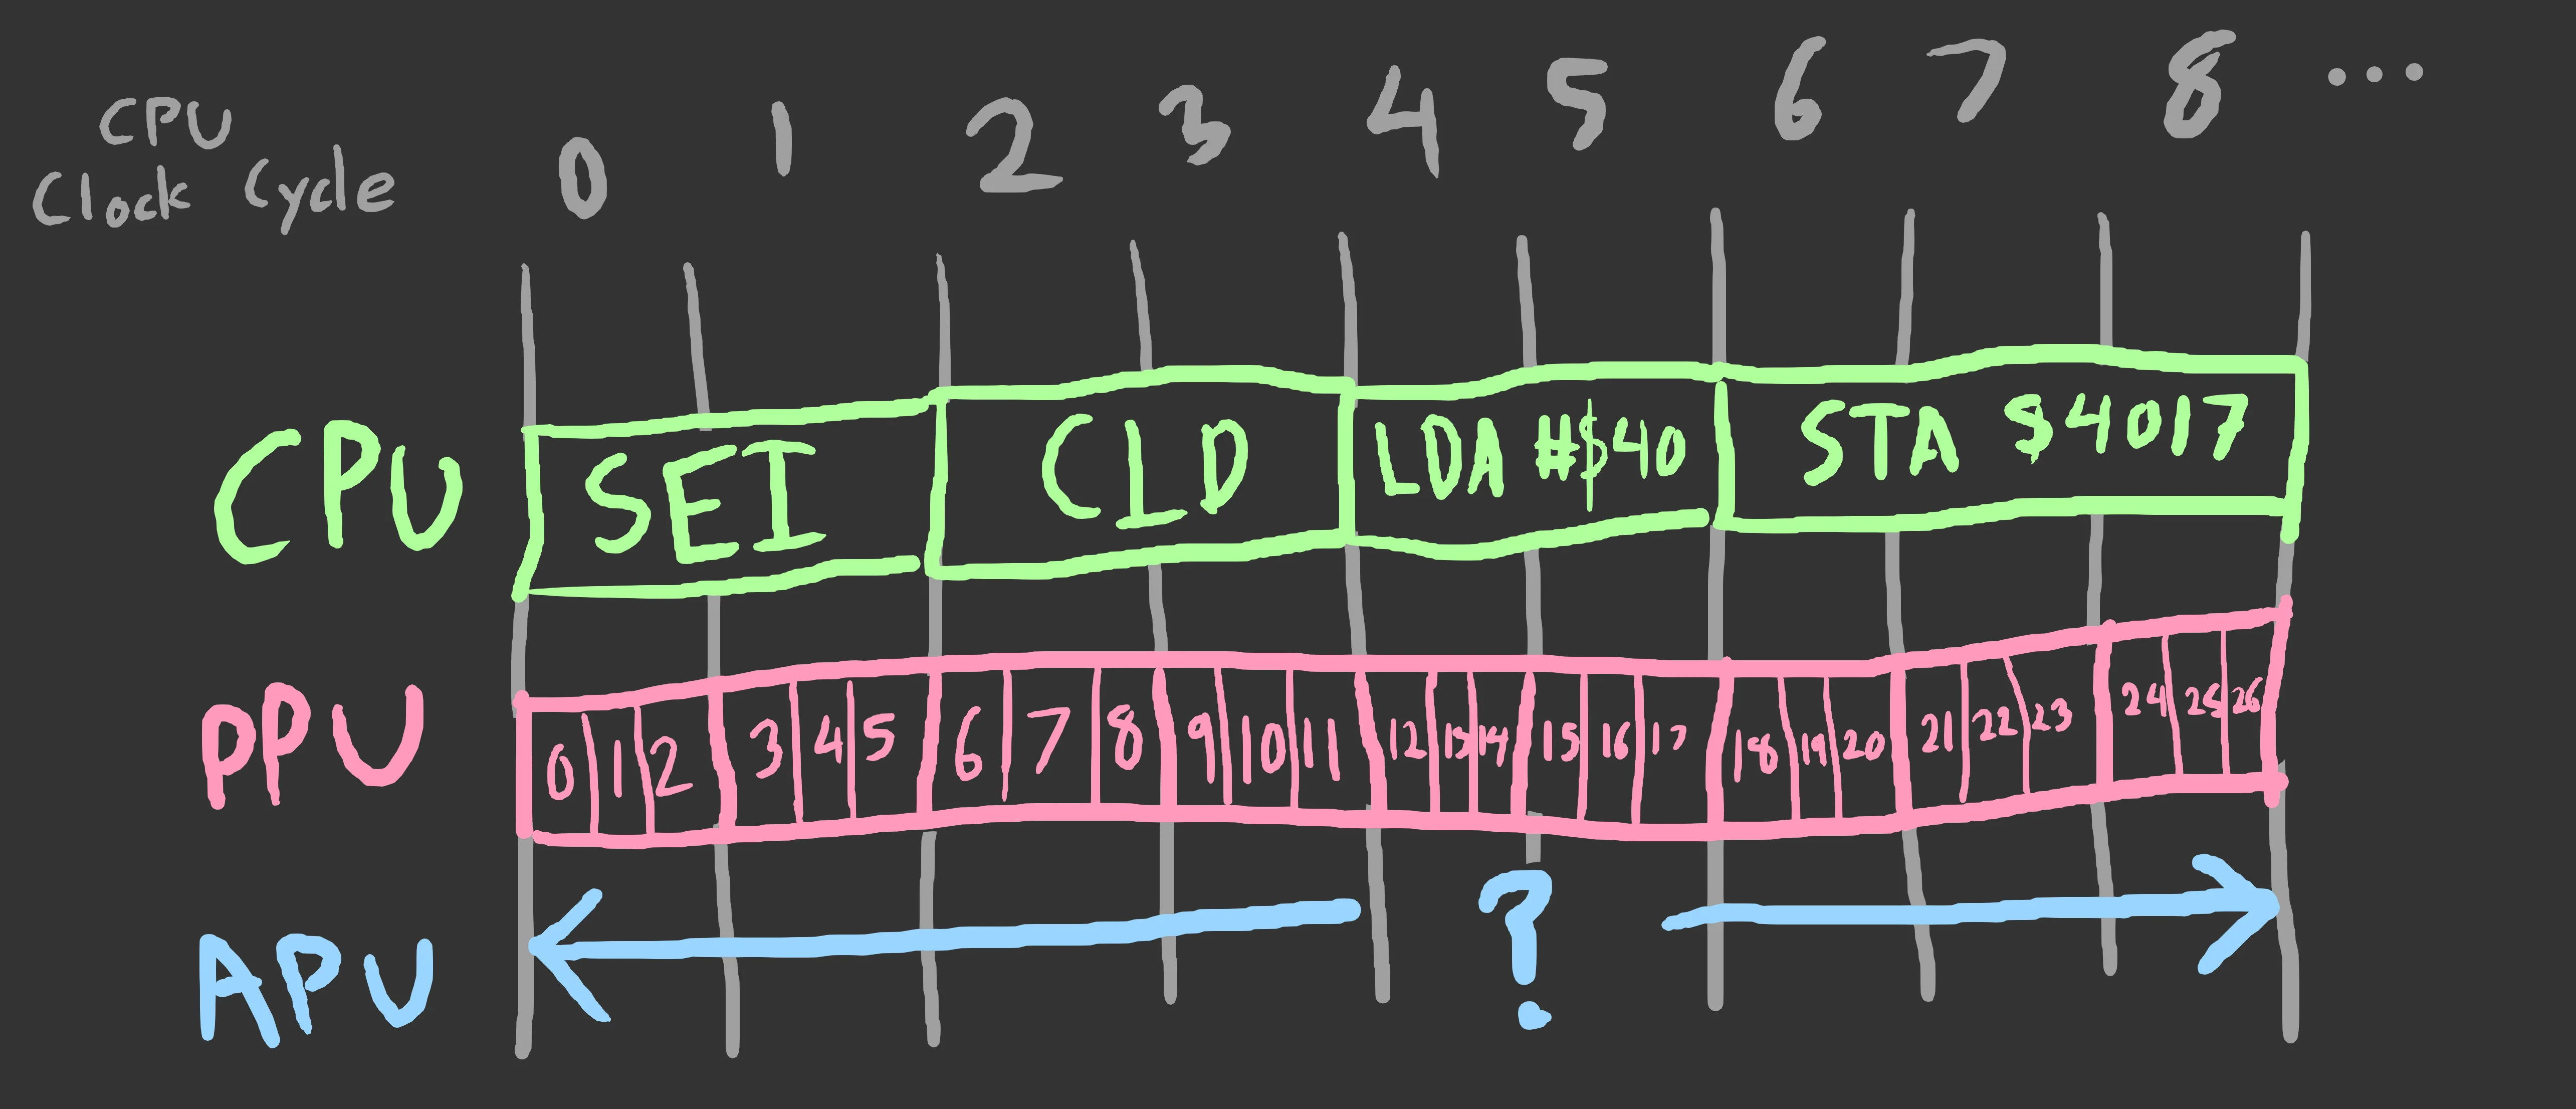
So, if we look at a timeline of CPU clock cycles, multiple PPU cycles are crammed into a single CPU clock cycle! This makes sense though, because there are 4 master clock cycles per PPU cycle, and 12 master clock cycles per CPU cycle (meaning: 12 master clock cycles = 3 PPU cycles = 1 CPU cycle). [edit: thanks to /u/silverslayer33 for the correction]
As we can also see in the above diagram, different CPU operations also have different clock timings. That means that, if we want an accurate emulator, we will need to switch between emulating the CPU and emulating the PPU mid-instruction.
Before we cross that bridge though, let’s start simple.
A simple ROM
So, I brewed up a very simple sample ROM from the following 6502 assembly:
lda #$05 ; Load 0x05 into the A register (LDA = LoaD A)adc #$06 ; Add 0x06 to A (ADC = ADd with Carry)tax ; Copy A to X (TAX = Transfer A to X)stx $0001 ; Store the value in X to address $0001 (STX = STore X)lda $0001 ; Load the value in $0001 into A (LDA = LoaD A)stop: jmp stop ; Go to "stop" repeatedly, as an endless loop (JMP = JuMP); Because the above line loops forever, our code will essentially end here…and the same assembly, but annotated with the 6502 machine code bytes, and with labels that correspond to memory locations:
a8000: lda #$05 ; A9 05a8002: adc #$06 ; 69 06a8004: tax ; AAa8005: stx $0001 ; 86 01a8007: lda $0001 ; A5 01a8009: jmp a8009 ; 4C 09 80(If you want to play along at home, you can get this as a standard NES ROM here: sample.nes)
I won’t go in-depth about 6502 assembly, but there’s a few important things I should point out:
- An instruction is broken up into an opcode (1 byte) followed by an optional operand (1 byte or 2 bytes, or 0 bytes if no operand). Therefore, instructions are between 1 and 3 bytes long
- The operand for an instruction is encoded as little-endian (which is why
jmp a8009has the bytes09 80— this is the little-endian encoding for the address$8009) - A single instruction can map to a few different opcodes. For example,
lda #$05uses the opcodeA9andlda $0001uses the opcodeA5 - Some instructions have special opcodes when dealing with addresses between
$0000and$00FF(which is whystx $0001andlda $0001both get encoded as 2 bytes instead of 3). This is called “zero-page addressing”
And, a few notes about the ROM file itself:
The first 16 bytes make up the iNES ROM header. It specifies how the ROM should get loaded into memory and what the rest of the ROM contains. We’re going to ignore most of this for now: our ROM uses the NROM mapper with 16 KiB of PRG-ROM (“program ROM”— the stuff for the CPU) and no CHR-ROM (“character ROM”— static data used for drawing with the PPU).
The rest of the ROM (16 KiB) make up the PRG-ROM, which is the part that gets loaded for the CPU. Since our actual code only takes up 12 bytes, most of this is padding. However, the last 6 bytes specify the interrupt vectors. There are 3 interrupt vectors, but for now we just care about the reset vector: this tells the NES what address to start execution at. Since the first instruction of our little sample program is at $8000, we include the bytes 00 80 for the reset vector. We zero out the other 2 vectors, so the last 6 bytes of our ROM are 00 00 00 80 00 00 (the reset vector is the 2nd of the 3 interrupt vectors, so it’s in the middle).
Emulating the CPU naïvely
With that out of the way, we should be able to start doing some basic emulation! Using what we talked about, here are some simple data structures to represent our NES state:
struct Nes {    cpu: Cpu,    ram: [u8; 0x0800], // The NES has 2 KiB of built-in RAM    rom: Rom,    // TODO: PPU    // TODO: APU}
struct Rom {    prg_rom: Vec<u8>, // Our ROM only has PRG-ROM, so we'll leave it at that}
#[derive(Debug)]struct Cpu {    pc: u16,    a: u8,    x: u8,    y: u8,    s: u8,    p: u8,}
I included the other 3 CPU registers we didn’t cover, but we aren’t using them in our sample ROM, so whatever. Hopefully the rest is pretty uncontroversial.
With that, let’s load our ROM:
use std::fs;use std::io::Read;
impl Nes {    fn from_rom(rom: Rom) -> Self {        // Convert the 2 bytes at offset 0x3FFC / 0x3FFD        // to a u16 to get PC        // NOTE: This only works for NROM ROMs with        // a size of 16 KiB!        let pc_bytes = &rom.prg_rom[0x3FFC..=0x3FFD];        let pc =            (pc_bytes[0] as u16)            | ((pc_bytes[1] as u16) << 8);
        // See http://wiki.nesdev.com/w/index.php/CPU_power_up_state        let cpu = Cpu { pc, a: 0, x: 0, y: 0, s: 0xFD, p: 0x34 };        let ram = [0; 0x0800];
        Nes { cpu, ram, rom }    }}
impl Rom {    fn from_file(filename: &str) -> Rom {        let rom_file = fs::File::open(filename).unwrap();
        // Skip the first 10 bytes, read 16 KiB for our PRG-ROM        // TODO: Actually parse the ROM header!        let prg_rom: Vec<u8> = rom_file            .bytes()            .skip(10)            .take(16_384)            .collect::<Result<Vec<u8>, _>>()            .unwrap();
        Rom { prg_rom }    }}
fn main() {    let rom = Rom::from_file("sample.nes");    let mut nes = Nes::from_rom(rom);
nes.run();}So far so good. To do some basic emulation, we’ll need the following:
nes.run()(rust): The function that actually parses our CPU opcodes and does work in an infinite loopnes.read_u8(addr: u16)(rust): A function that takes a 16-bit address reads the byte at that addressnes.read_u16(addr: u16)(rust): A function that takes a 16-bit address, reads 2 bytes starting at that address, and converts it to au16nes.write_u8(addr: u16, value: u8)(rust): A function that takes a 16-bit address and write this value at that address
Let’s start with our read and write functions. If we check the Nesdev articles on the CPU memory map and the NROM memory banks, we can see that reads/writes map to different parts of our NES state. For example, writing to $0002 maps to the third byte of internal RAM, so it should set nes.ram[2](rust); reading from $8000 maps to the first byte of PRG-ROM, so it should return the value of nes.rom.prg_rom[0](rust). In code:
impl Nes {    fn read_u8(&self, addr: u16) -> u8 {        match addr {            // RAM (mirrored every 0x0800 bytes)            0x0000..=0x07FF => {                let ram_offset = (addr as usize) % self.ram.len();                self.ram[ram_offset]            }            // PRG-ROM (mirrored to fill all 32 KiB)            0x8000..=0xFFFF => {                let rom_len = self.rom.prg_rom.len();                let rom_offset = (addr as usize - 0x8000) % rom_len;                self.rom.prg_rom[rom_offset]            }            _ => {                unimplemented!("Read from ${:04X}", addr);            }        }    }
    // This is the same logic we used in `Nes::from_rom`, so    // we could refactor this    fn read_u16(&self, addr: u16) -> u16 {        let lo = self.read_u8(addr);        let hi = self.read_u8(addr.wrapping_add(1));
        (lo as u16) | ((hi as u16) << 8)    }
    fn write_u8(&mut self, addr: u16, value: u8) {        match addr {            // RAM (mirrored every 0x0800 bytes)            0x0000..=0x07FF => {                let ram_offset = (addr as usize) % self.ram.len();                self.ram[ram_offset] = value;            }            // PRG-ROM (writes are ignored for NROM)            0x8000..=0xFFFF => { }            _ => {                unimplemented!("Write to ${:04X}", addr);            }        }    }}
So now we have enough to finally emulate the CPU for our sample ROM!
impl Nes {    // ...
    fn run(&mut self) {        loop {            let pc = self.cpu.pc;            let opcode = self.read_u8(pc);
            let next_pc;            match opcode {                // LDA:                //   Load immediate value into A                0xA9 => {                    let value =                        self.read_u8(pc.wrapping_add(1));                    self.cpu.a = value;                    next_pc = pc.wrapping_add(2);                }                // ADC:                //   Add immediate value to A                0x69 => {                    let value =                        self.read_u8(pc.wrapping_add(1));                    self.cpu.a =                        self.cpu.a.wrapping_add(value);                    next_pc = pc.wrapping_add(2);                }                // TAX:                //   Transfer A to X                0xAA => {                    self.cpu.x = self.cpu.a;                    next_pc = pc.wrapping_add(1);                }                // STX:                //   Store X to address between                //   $0000 and $00FF                0x86 => {                    let addr_lo =                        self.read_u8(pc.wrapping_add(1));                    // Between $0000 and $00FFF:                    let addr = addr_lo as u16;                    self.write_u8(addr, self.cpu.x);                    next_pc = pc.wrapping_add(2);                }                // LDA:                //   Load A from address between                //   $0000 and $00FF                0xA5 => {                    let addr_lo =                        self.read_u8(pc.wrapping_add(1));                    // Between $0000 and $00FF:                    let addr = addr_lo as u16;                    self.cpu.a = self.read_u8(addr);                    next_pc = pc.wrapping_add(2);                }                // JMP:                //   Jump to address by changing PC                0x4C => {                    let target =                        self.read_u16(pc.wrapping_add(1));                    // Set PC to the address we just read:                    next_pc = target;                }                _ => {                    unimplemented!("Opcode {:02X}", opcode);                }            }
            self.cpu.pc = next_pc;
// Some nice debug output so we can see // the CPU state after every cycle println!("Opcode: {:02X}", opcode); println!("CPU State: {:02X?}", self.cpu); println!("-----------------"); } }}(This code uses one very nice underappreciated Rust feature! We have line that just says let next_pc;(rust), which will hold the new address of PC. By making an uninitialized and immutable variable, we force each match branch to set next_pc exactly once! I just think that’s beautiful…)
So there we have it! We have a very basic but functional NES emulator, which emulates the CPU to run a ROM, and it supports 5 different opcodes!
Well… kind of. There are a few things wrong in our above code. Most importantly, we aren’t setting the P register (which a lot of different opcodes change). Also, ADC doesn’t handle carrying at all. Third, and this is the hard part, we are ignoring cycles!
Cycles: the hard part
To reiterate, our CPU is just one component of our emulator. While it’s running, the PPU and APU are both doing their own thing. To top it off, the NES’s CPU and PPU have very precise timings, which some games lean heavily on. Even simple games can have major issues if your timing is too far off!
But it gets worse. It’s not sufficient to “pause” emulation for a few cycles between instructions. Specifically, the 6502 performs memory reads and writes on specific instruction cycles.
For a concrete example, let’s look at the STX opcode with zero-page addressing (opcode A5, something like STX $0001). This opcode takes 3 cycles, which work like this:
- Cycle 1: Read the opcode from
PC, then incrementPC - Cycle 2: Read the zero-page address by reading
PC, then incrementPCagain - Cycle 3: Write the value of
Xto the address that we read in cycle 2
(As with everything else, there’s a Nesdev page for that (which also includes cycle timings for all opcodes, including unofficial ones!))
It can be really hard to get an observable difference here, but in theory a game could read from some volatile memory address that changes values between cycles… yikes! So, if we were interested in writing a fully accurate emulator, we’d have to solve this.
And, while Lochnes isn’t fully accurate, I did solve this particular problem using a pretty cool tool!
Generators to the rescue!
At the time of writing, generators are an unstable Rust feature. But, they are perfect for our use case! They let you write closures that use the yield keyword, which can be used for all sorts of things. For example, if we wanted to print the Fibonacci sequence, we could pretty easily express this with generators:
#![feature(generators, generator_trait)]
use std::pin::Pin;use std::ops::{Generator, GeneratorState};
fn main() {    // This is our generator (it's a closure that    // uses the `yield` keyword)    let mut fib = || {        let mut a = 0;        let mut b = 1;
        loop {            yield b;            let new_a = b;            let new_b = a + b;            a = new_a;            b = new_b;        }    };
    // Only get the first 10 Fibonacci numbers    for _ in 0..10 {        // Repeatedly call `resume` on our generator        // to get the values that get yielded        match Pin::new(&mut fib).resume() {            GeneratorState::Yielded(n) => { println!("{}", n); }            GeneratorState::Complete(_) => {                // If our generator returned, we could                // handle that here                unreachable!();            }        }    }
println!("Done");}…okay, using generators is real ugly, and there are definitely more idiomatic ways of iterating through the Fibonacci sequence in Rust, but hopefully you can appreciate the power of yield! We can use it to “suspend” our function with some intermediate value then “resume” it later (or we can just use it to stop execution after some time, like in this case)
So, let’s try dropping in generators with what we have so we can iterate on it:
#![feature(generators, generator_trait)]
use std::pin::Pin;use std::ops::{Generator, GeneratorState};
impl Nes {    // Instead of doing work, `run` returns a generator    // that can be resumed repeatedly (it doesn't do anything    // until the first time `.resume()` gets called).    //    // We need the lifetime here because our generator    // borrows `self`-- after all, calling `.resume()` is    // supposed to update the emulator's state!    fn run<'a>(&'a mut self)        -> impl Generator<Yield = (), Return = ()> + 'a    {        // Nice shorthand for creating a looping generator        // (parsed as `(move || { loop { ... }})`). We need        // `move` here because the closure keeps the        // reference to `self`        move || loop {            let pc = self.cpu.pc;
            // ... the rest of our old `run` function ...
            // "Yield" to stop for a cycle. For now, we pretend            // that every instruction takes one cycle            yield;        }    }}
fn main() {    let rom = Rom::from_file("sample.nes");    let mut nes = Nes::from_rom(rom);
let mut nes_run = nes.run(); loop { match Pin::new(&mut nes_run).resume() { GeneratorState::Yielded(()) => { println!("> Cycle"); } GeneratorState::Complete(_) => { // Stop running if our `run` generator stops break; } } }}If we run this, we’ll see > Cycle is printed between each instruction. That’s not right though, because each instruction takes multiple cycles! In fact, on the 6502, all instructions take at least 2 cycles.
Instead of going in-depth on how each instruction works, let’s look at our friend STX again. Remember, this is how the cycles play out:
- Cycle 1: Read the opcode from
PC, then incrementPC - Cycle 2: Read the zero-page address by reading
PC, then incrementPCagain - Cycle 3: Write the value of
Xto the address that we read in cycle 2
…and the same thing in code:
impl Nes {    fn run<'a>(&'a mut self)        -> impl Generator<Yield = (), Return = ()> + 'a    {        move || loop {            // Cycle 1:            //   Read the opcode from PC, then increment PC            let opcode = self.read_u8(self.cpu.pc);            self.cpu.pc = self.cpu.pc.wrapping_add(1);            yield;
            // Now we have our opcode, so match on it again            match opcode {                // STX:                //   Store X to address between                //   $0000 and $00FF                0x86 => {                    // Cycle 2:                    //   Read the zero-page address by                    //   reading PC, then increment PC again                    let addr_lo = self.read_u8(self.cpu.pc);                    let addr = addr_lo as u16;                    self.cpu.pc = self.cpu.pc.wrapping_add(1);                    yield;
                    // Cycle 3:                    //   Write the value of X to the address                    //   that we read in cycle 2                    self.write_u8(addr, self.cpu.x);                    yield;
                    // NOTE: Because we already incremented PC,                    // we don't have `next_pc` any more                }                // ... other opcodes ...            }
            // NOTE: Now all are yields are above this point
// Some nice debug output so we can see what we're doing println!("Opcode: {:02X}", opcode); println!("CPU State: {:02X}", self.cpu); println!("-----------------"); } }}Repeat with our other opcodes and voilà! We now have cycle-accurate emulation of 6502 instructions, and one that handles volatile memory reads at that! We can observe this by running our code and counting the number of cycles between each instruction:
> Cycle> CycleOpcode: A9CPU State: Cpu { pc: 8002, a: 05, x: 00, y: 00, s: FD, p: 34 }-----------------> Cycle> CycleOpcode: 69CPU State: Cpu { pc: 8004, a: 0B, x: 00, y: 00, s: FD, p: 34 }-----------------> Cycle> CycleOpcode: AACPU State: Cpu { pc: 8005, a: 0B, x: 0B, y: 00, s: FD, p: 34 }-----------------> Cycle> Cycle> CycleOpcode: 86CPU State: Cpu { pc: 8007, a: 0B, x: 0B, y: 00, s: FD, p: 34 }-----------------> Cycle> Cycle> CycleOpcode: A5CPU State: Cpu { pc: 8009, a: 0B, x: 0B, y: 00, s: FD, p: 34 }-----------------If you compare the number of cycles for each instruction to, say, Andrew Jacobs’ 6502 instruction reference page, we should see that the number of cycles line up! (Hint: Ctrl+F and search for $A5 to find the entry for opcode A5… in this case A5 should take 3 cycles, which is exactly how many times > Cycle gets printed)
Throwing parallelism in the mix with the PPU
Before we pat ourselves on the back too hard, let’s revisit why we needed to deal with cycles at all: we need to precisely time how the CPU runs alongside the PPU and APU. So let’s actually exercise our newfound cycle freedom to lay the foundation for PPU emulation.
Let’s do a minor refactor first, by separating nes.run()(rust) from the CPU emulation code.
impl Nes {    fn run_cpu<'a>(&'a mut self)        -> impl Generator<Yield = (), Return = ()> + 'a    {        move || loop {            let opcode = self.read_u8(self.cpu.pc);            // ... everything in our old `run` function ...        }    }
    fn run<'a>(&'a mut self)        -> impl Generator<Yield = (), Return = ()> + 'a    {        let mut run_cpu = self.run_cpu();
        move || loop {            // Step the CPU for one cycle            match Pin::new(&mut run_cpu).resume() {                GeneratorState::Yielded(()) => { }                GeneratorState::Complete(_) => { break; }            }
// Yield one NES cycle yield; } }}Now we have more control with how our CPU runs versus the NES as a whole. With that out of the way…
…uhh, let’s talk about the PPU. As it turns out, emulating the PPU is actually really hard, so we’re not going to do all that right now. Instead, we’ll emulate one small thing the PPU does do: it sets the NMI flag on the CPU.
To make a long story short, the NMI (or non-maskable interrupt) flag tells the CPU to stop whatever it’s doing and handle an important event. In the NES, it’s used specifically to signal when VBlank (vertical blanking) starts, which is the small window of time where the CPU can safely talk to the PPU to update graphics data. VBlank— and, consequently, NMI— happen at the end of each frame.
So basically, the PPU will set the NMI flag to true once per frame, and the CPU will set it back to false immediately (indicating that the CPU handled the NMI). ez-pz, let’s do this:
struct Cpu {    // ...    nmi: bool, // Set to false initially}
impl Nes {    fn run<'a>(&'a mut self)        -> impl Generator<Yield = (), Return = ()> + 'a    {        let mut run_cpu = self.run_cpu();        let mut run_ppu = self.run_ppu();
        move || loop {            // Step the CPU for one cycle            match Pin::new(&mut run_cpu).resume() {                GeneratorState::Yielded(()) => { }                GeneratorState::Complete(_) => { break; }            }
            // Step the PPU for 3 cycles (the PPU            // is 3x faster than the CPU)            for _ in 0..3 {                match Pin::new(&mut run_ppu).resume() {                    GeneratorState::Yielded(()) => { }                    GeneratorState::Complete(_) => { break; }                }            }
            // We ran both the CPU and PPU,            // so yield one NES cycle            yield;        }    }
    fn run_cpu<'a>(&'a mut self)        -> impl Generator<Yield = (), Return = ()> + 'a    {        move || loop {            if self.cpu.nmi {                // NOTE: It's intentional that this                // check happens on the cycle before                // the next instruction executes!
                // TODO: Read NMI interrupt vector                // from address $FFFE, then set PC                println!("=== NMI! ===");                self.cpu.nmi = false;            }
            let opcode = self.read_u8(self.cpu.pc);            // ... same as before ...        }    }
    fn run_ppu<'a>(&'a mut self)        -> impl Generator<Yield = (), Return = ()> + 'a    {        move || loop {            for _frame in 0.. {                // - Each PPU cycle produces 1 pixel                // - Each line lasts 341 cycles (256 visible)                // - Each frame lasts 262 lines (240 visible)                const PPU_CYCLES_PER_FRAME: u32 = 341 * 262;                for cycle in 0..PPU_CYCLES_PER_FRAME {                    // NMI starts at the *second* cycle!                    if cycle == 1 {                        self.cpu.nmi = true;                    }
                    // TODO: Output pixels
yield; } } } }}So basically, this code should:
- Run
run_ppuin parallel withrun_cpu, running 3 PPU cycles for each CPU cycle - Set the
nmiflag totrueon the second cycle of each frame inrun_ppu - Set the
nmiflag tofalsebetween instructions inrun_cpu
Pretty straightforward, right? rustc disagrees:
error[E0499]: cannot borrow `*self` as mutable more than once at a time --> src/main.rs:96:27 |92 | fn run<'a>(&'a mut self) | -- lifetime `'a` defined here...95 | let mut run_cpu = self.run_cpu(); | ---- first mutable borrow occurs here96 | let mut run_ppu = self.run_ppu(); | ^^^^ second mutable borrow occurs here97 |98 | / move || loop {99 | | // Step the CPU for one cycle100 | | match Pin::new(&mut run_cpu).resume() {101 | | GeneratorState::Yielded(()) => { }... |116 | | yield;117 | | } | |_________- returning this value requires that `*self` is borrowed for `'a`(dammit we almost got to the end of this article without any weird compiler errors)
Fixing the pesky compiler error
Let’s try to break this down. So run_cpu is a generator that mutably borrows nes because it needs to update the CPU’s registers each time it runs. run_ppu is a generator that mutably borrows nes because it needs to set the CPU’s nmi field once per frame.
I think this is actually a really good example of where Rust’s borrow checker shines! We need to update the same structure from two different “threads”, even though those “threads” are generators that run on a single OS thread. I think a common misconception of Rust’s borrow checker is that it only exists for multi-threading, but manishearth has a great article that gives some examples where the borrow checker is useful in single-threaded code. I think the above code is another good example: we are literally threading the execution of our code between the CPU and PPU, and we need to use the right primitives to ensure we don’t have any data races!
(A natural consequence of this is that we could easily run the CPU and PPU on different threads by using multi-threaded primitives like RwLock!)
So, we need shared mutability, we’re running on a single thread, we’re dealing with Copy types (u8, etc.), and we don’t need to hold references to the values? That sounds perfect for Cell!
There’s a few different ways you could slice it, but I think the easiest is just to update all our fields to use Cell<u8> instead of u8, etc. where possible. Note that we should skip changing prg_rom since we don’t need to mutate it! Here’s what our updated structures look like:
use std::cell::Cell;
struct Nes {    cpu: Cpu,    ram: Cell<[u8; 0x0800]>,    rom: Rom,    // TODO: PPU    // TODO: APU}
struct Rom {    prg_rom: Vec<u8>,}
#[derive(Debug)]struct Cpu {    pc: Cell<u16>,    a: Cell<u8>,    x: Cell<u8>,    y: Cell<u8>,    s: Cell<u8>,    p: Cell<u8>,    nmi: Cell<bool>,}
…then we change write_u8, run, run_cpu, and run_ppu to take &self instead of &mut self, and then we use .get() / .set() to read/write the cell values. A small sample of the changes:
impl Nes {    fn run_cpu<'a>(&'a self) -> impl Generator<Yield = (), Return = ()> + 'a {        move || loop {            // Keep in mind the difference between calling            // `.get()` in an expression versus saving it in            // a variable for later! They seem equivalent, but            // if the PPU or some other code changes the value            // in the meantime, you'll be using stale data!            if self.cpu.nmi.get() {                // TODO: Read NMI interrupt vector                // from address $FFFE, then set PC                println!("=== NMI! ===");                self.cpu.nmi.set(false);            }
let opcode = self.read_u8(self.cpu.pc.get()); // ... } }}Then, like magic, we see === NMI! === appear out of thin air in our CPU generator:
> Cycle> CycleOpcode: A9CPU State: Cpu { pc: Cell { value: 8002 }, a: Cell { value: 05 }, x: Cell { value: 00 }, y: Cell { value: 00 }, s: Cell { value: FD }, p: Cell { value: 34 }, nmi: Cell { value: true } }-----------------=== NMI! ===> Cycle> CycleWhich is exactly what we expect! This is essentially how our execution is playing out:
nes_run.resume():- 1 CPU cycle:
cpu_run.resume(): Execute cycle 1 of opcodeA9
- 3 PPU cycles:
ppu_run.resume(): (do nothing)ppu_run.resume(): Setnmito trueppu_run.resume(): (do nothing)
- 1 CPU cycle:
nes_run.resume():- 1 CPU cycle:
cpu_run.resume(): Execute cycle 2 of opcodeA9
- 3 PPU cycles:
ppu_run.resume(): (do nothing)ppu_run.resume(): (do nothing)ppu_run.resume(): (do nothing)
- 1 CPU cycle:
nes_run.resume():- 1 CPU cycle:
cpu_run.resume(): NMI is true, so handle it; Execute cycle 1 of opcode69
- 3 PPU cycles
ppu_run.resume(): (do nothing)ppu_run.resume(): (do nothing)ppu_run.resume(): (do nothing)
- 1 CPU cycle:
Takeaways
So, that about wraps up what I had to say on Lochnes and Rust generators. Of course, generators aren’t the only way to structure an emulator— I’m not even aware of other emulators that take a similar approach, so I imagine it’s in a small minority (or maybe it stands alone, who knows? Not me because I didn’t bother looking into it!) So, a few closing thoughts…
Generators let you do really cool things for free
In our example, we just called run_nes.resume() in a loop, but what happens when you don’t call it in a loop? What if, instead, you read a command on the command line, run .resume() a few times, and repeat? Well, you basically got an interacive debugger for free! You could write commands to print registers or memory address, step in/out/over different instructions, set breakpoints, or run until a breakpoint hits. Writing a debugger using a generator like that becomes basically free. I didn’t get around to implementing a debugger proper in Lochnes, but I had some prototype debugging code while I was… well… debugging.
We also only ever used yield; with no value, but like in the fibonacci example, we could just as easily yield some value as well. In Lochnes, yielding isn’t just used for cycles: it’s also used to halt emulation during VBlank, and it’s used whenever controller inputs need to be read. I used an enum to indicate why the generator yielded, which allows the caller to do something in response. A generator is like a callback but in reverse!
The whole reason I went with generators at all was for one goal: clarity. When I was first writing the cycle-accurate code, I was reading a text document that said things like “Cycle 1: Read opcode, increment PC”, etc. for each CPU cycle. After writing the code with generators, I felt it was very clear how each statement in the document mapped to a line of code, where each cycle was separated by a yield. I have a hard time imagining a clearer way of expressing the exact cycle timings of 6502 instructions in code along with their behavior (although I’m definitely not saying there’s no better way to do it)! Or, maybe said more concretely: the main differences between our naïve CPU emulation and our cycle-accurate one were some yields and the use of .get() and .set(). I think this is very comparable to async/await, where a big appeal is how similar using await looks to straight procedural code.
Lochnes is just fast enough (and not nearly as fast as I wanted)
Hopefully it’s no major surprise that Lochnes isn’t the fastest NES emulator avaiable. Even with my 6th-gen i7 desktop machine, each frame takes about 11ms to run, meaning it’s slightly faster than real-time. It’s actually only single-threaded, so that limits how much performance you’d get with a newer CPU (I also tried it on a 2017 MacBook Pro and got similar performance even though the desktop has more computing juice). I suspect there’s a lot of low-hanging fruit in optimizing Lochnes, but I suspect performance is actually a downside of using generators in this context.
Under the hood, generators just get compiled to a big state machine function, where the generator value itself holds the state (the local variables in the generator as well as which yield point it’s at). I haven’t really looked into it, but I suspect Rust’s generator implementation is fairly simple, and that dealing with a match statement with hundereds of opcodes (and, as a result, hundereds of yield points) leads to code that’s too hard for LLVM to really trim down.
Also, I have to wonder what kinds of algorithmic improvements I’m missing out on because of generators? If I went with a manual state machine approach, would it be easier to optimize by-hand?
My generator wishlist
- Stability! Generators are still unstable, so Lochnes can only run on nightly Rust as a result!
.resume()should take a value. Just like how you can useyieldwith a value that gets returned by.resume(), you should be able to use.resume()with a value that gets returned byyield! I think this would allow for even more cool uses of generators (imagine if something like this worked)! As-is, you can kind of work around this by using interior mutability (I did this in a few places), but it would be neat as a native feature of generators.- I want
#[derive(...)]annotations on closures. One problem with using generators for my emulator is that I can’t serialize/deserialize all the state! That means that, if I want to implement save states for Lochnes, I would need to take special care that I can get back to the same generator state after saving/loading. Generators turn into structs under-the-hood, so adding#[derive(Serialize)]or similar could work in theory. I’m not really sure if this would actually be practical though…
Useful resources for writing a NES emulator
- Nesdev is the single greatest resource if you’re trying to write an NES emulator or a NES game. Even if the wiki doesn’t have the level-of-detail you need, it will certainly have a link to a page that does! There were a couple of times when Nesdev was actually down when I was working on Lochnes, and it basically prevented me from making any progress… anyway, here’s some pages that I found extra useful during development:
- CPU memory map and PPU memory map
- iNES mappers and NROM banks
- iNES file format
- PPU frame timing
- CPU cycle timing (it’s not on the wiki proper— for some reason it’s just a standalone text document)
- Andrew Jacobs’ 6502 reference
- 6502 instruction reference page: Includes a detailed reference on the meaning of all the official 6502 opcodes
- 6502 addressing modes: Describes how each of the addressing modes works
- This big git repo of various NES test ROMs. I included this as a submodule in Lochnes to write some integration tests around all the 6502 opcodes. I used
nes_instr_testby Shay Green (a.k.a. Blargg) to start off - Mesen: A really, really good NES emulator. It has an amazing built-in debugger (including a visual debugger for the PPU!), and is well-known for being very accurate. Also, it has rewinding and really good Netplay!
- Ghidra: An open-source reverse engineering tool from the NSA, with disassembly and static analysis tools that I hear are very comparable to IDA Pro. It has out-of-the-box support for 6502 assembly, but unfortunately doesn’t include anything by default for loading NES ROMs. I wrote a very hacky and barebones Ghidra plugin for loading NES ROMs called “GhidraNes”, but it doesn’t work very well yet (plus I haven’t written anything about installing or using it… which sucks becuase I’ve forgotten how to install and use it)
Gallery of failure
One of the fun things about writing an emulator is seeing the things that almost work… the pixellated vomit from an off-by-one error in your rendering code, or a typo in an instruction that cascades into failure. If you’ve just spent 6 hours staring at 6502 disassembly and thought the code should finally work this time, then it’s a horrifying experience. Otherwise, it’s just a fun little artifact of working on an emulator :)
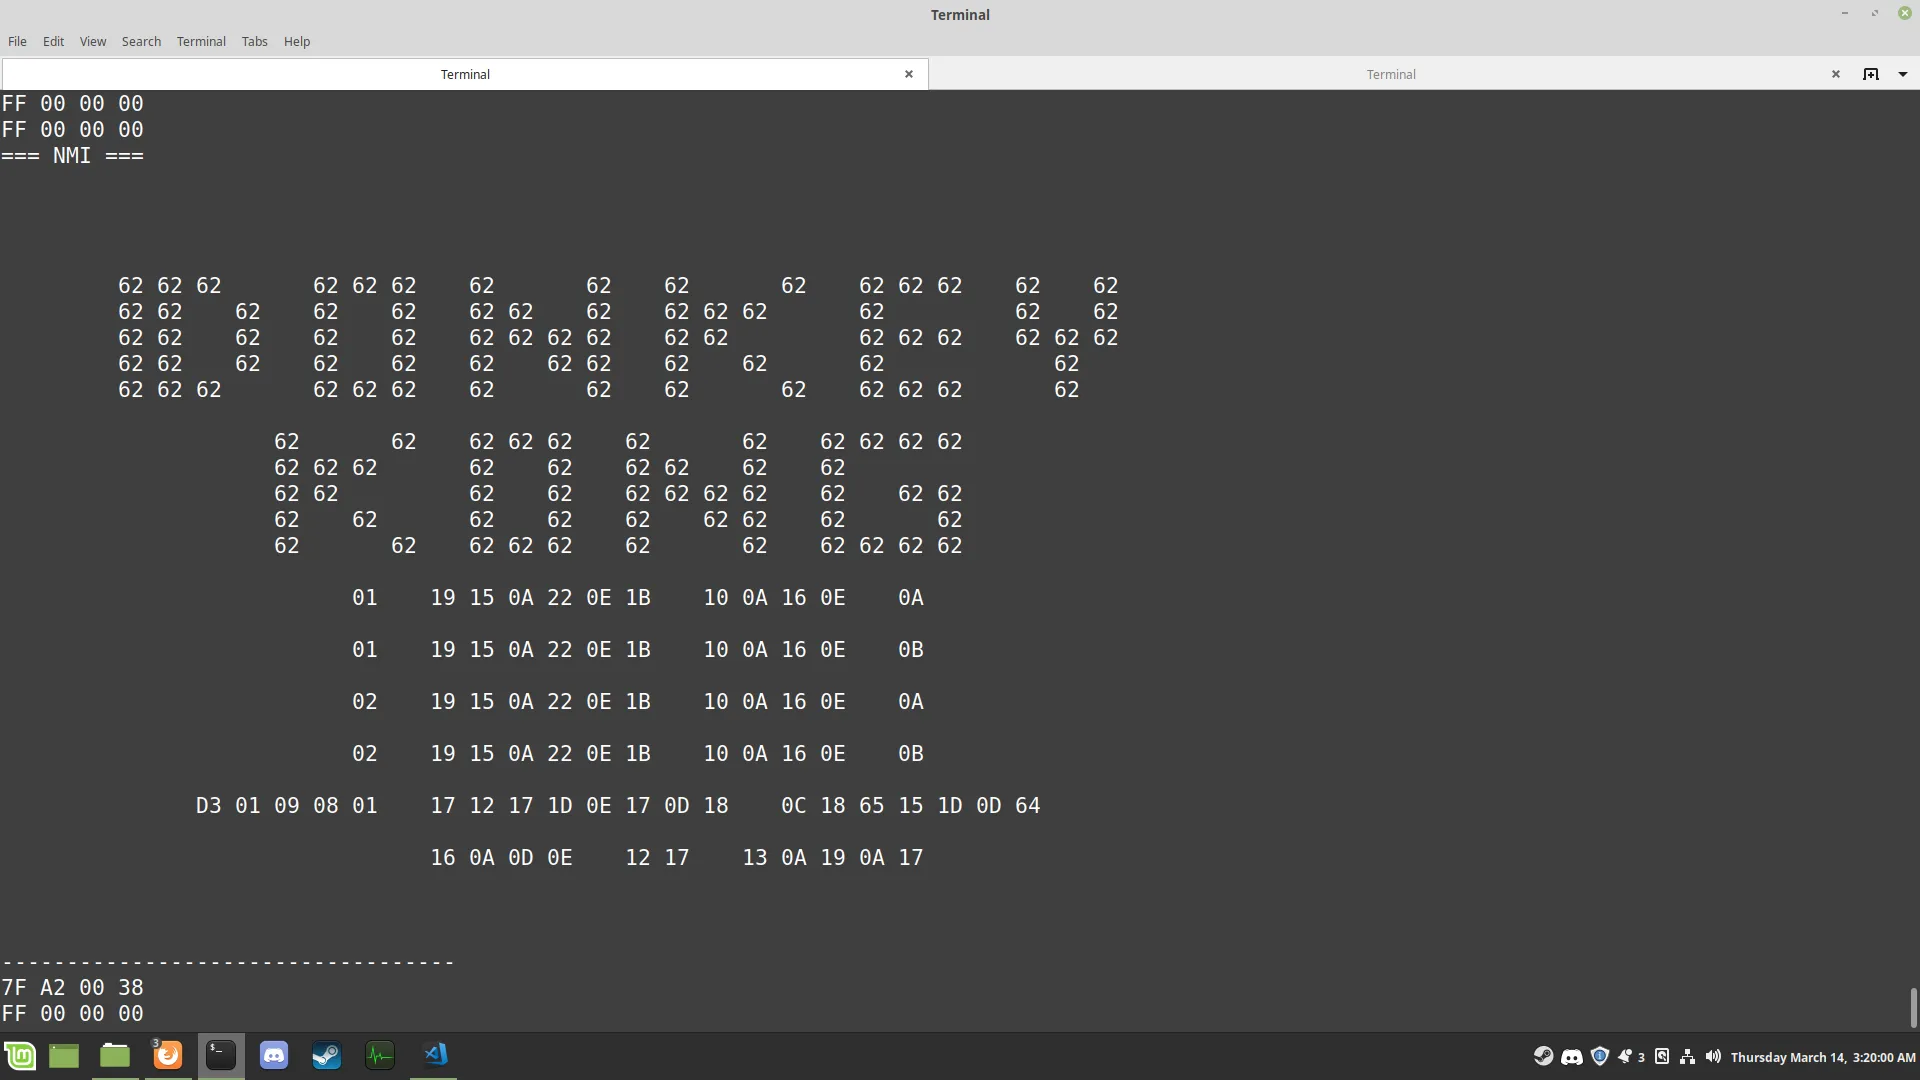
(This was the first time I got rendering working in Lochnes!)

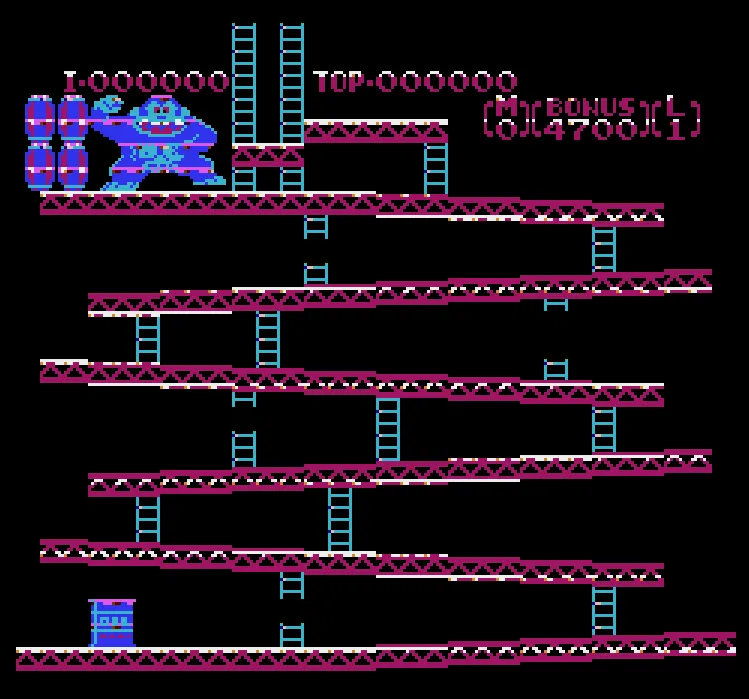
(It’s actually kinda hard to get all the NES color pallete stuff right)

Thanks to /u/silverslayer33, /u/slavox, and /u/BrunoValads for corrections!